Hello, my final blog posting will on the disposable Dengue test kit from HUMAN(Company name)
INTRODUCTION
Dengue is a flavivirus transmitted in the tropics and involves both humans abd Aedes mosquitos. The 4 serotypes of dengue (DEN-1, -2, -3 and -4) are similar, but are antigenically different. This implies that infection with one of the serotypes only provides cross-protective immunity for a few of months.
IgM antibodies are detectable within 5 days and persist for 2-3 months while IgG antibodies appear a few days later and provide a lifelong immunity.
PRINCIPLE
The dengue test employs colloidal gold particles coated with different recombinant dengue envelope proteins. When a specimen (serum) containing anti-dengue IgG and/or IgM antibodies is added to the test, the antibodies react with the dengue envelope proteins resulting in immune complexes which migrate along the membrane and are captured by monoclonal anti-human IgG in the first line and/or IgM in the second. The excess immune complexes then migrate further before binding to anti-dengue IgG which are coated on the control line.
If there are no dengue antibodies present in the specimen, only the control line will appear.
Note: The control line must appear in every test and the absence of the control line might indicates improper usage or the deterioration of the reagents.
Thank You
Stanley
0702201E
Wednesday, November 4, 2009
Thursday, October 29, 2009
RNA extraction from tissues
Procedures for RNA extraction from tissues:
1. pre-weigh an empty cryovial
2. take the tissue specimen out from the cryovial and place it on a 100mm petri dish
3. use a scapel and sterican (like fork and knife) to cut the tissue into desired size
4. transfer the tissue into the pre-weigh cryovial and weigh again (this will give the exact weigh of the tissue being process)
5. transfer the surplus tissue into the original cryovial and keep in the nitrogen tank
6. add 650µl of RLT buffer into the cryovial
7. pound the tissue using a pipette tip until the solution turn orange in colour.
8. transfer the solution into QIA shredder column and centrifuge at 14 000rpm for 4minutes
9. transfer the flow through into a new eppendorf tube and add in 550µl of 70% ethanol
10. centrifuge the eppendorf tube at 14 000rpm for 3 minutes
11. transfer the solution into Rneasy column and centrifuge at 14 000rpm for 15 seconds
12. discard the flow through
13. add 700µl RW1 buffer into the Rneasy column and centrifuge at 14 000rpm for 15 seconds
14. discard the flow through
15. add 500µl RPE buffer into the Rneasy column and centrifuge at 14 000rpm for 15 seconds
16. discard the flow through
17. centrifuge the Rneasy column at 14 000rpm for 1 minute
18. transfer the Rneasy column into a new sterilised round bottom tube
19. add 30µl Rnase-free water and centrifuge at 14 000rpm for 1 minute
20. transfer the flow into the column and centrifuge at 14 000rpm for 1 minute
21. the flow through is the RNA extracted
Thing to note
- after taking the cryovial of tissue out from the nitrogen tank, keep it in liquid nitrogen.
Yeo Sok Kian Jocelyn
0703359J
Monday, October 26, 2009
Immunochemistry- G6PD quantification
Hey guys, sorry for the late posting! This will be the last time I'm sharing! (:
This time I am going to talk about the quantitative determination of G6PD on an analyzer, which is currently undergoing evaulation.
Principle
The principle of the assay is to utilize G6PD (that is present in the RBCs) that catalyzes the oxidation of glucose-6-phosphate (G6P) to 6-Phosphogluconolactone (6PG). This takes place in the presence of NADP, which will be reduced to NADPH. The NADPH produced will then react with a colour reagent to produce a fluorescence that will be measured colourimetrically at 550nm.
What is G6PD
G6PD is an important cytoplasmic enzyme that is found in cells and plays a crucial role in reducing the oxidative effect of the free radicals on the RBCs. It is involve in the first step of the hexose-monophosphate pathway (HMP) to produced NADPH, which is essential in maintaining the integrity of the RBCs membrane. Hence, with a deficiency of this enzyme, the RBCs are prone to lysis due to the oxidative stress. And this may lead to hemolytic anaemia.
Why do this test?
An awareness of G6PD deficiency had been raised many years back in Singapore. Hence, all newborns will be screened for this deficiency. And of course, the samples used for this test will be all cord blood samples.
How does the assay work?
First, all the samples will be transferred manually into eppendorf tubes and loaded onto the analyzer. Next, an elution buffer will then be added to the blood to lyse the RBCs. This is to bring out the enzyme, if it is present. The reagent solution is then added for the production of NADPH in the presence of G6PD. After which, the colour reagent will be added for colour production if NADPH is produced. Incubation will take place before the absorbance reading is taken.
The quantitative results will then be calculated after the readings are entered onto Excel. For deficient samples, they will be re-run again to confirm whether if the enzyme is really absent.
That should be all! (: Feel free to ask me any questions, I will try my best to answer them.
Posted by: Tan Siew Ming
0702862D
Wednesday, October 7, 2009
research: BCA assay
it's week 16! how's everyone doing!
this week, i'm going to explain what is BCA protein assay.
what is BCA protein assay? it is an assay that quantitates protein concentration.
what does BCA stands for? BCA stands for bicinchorinic acid.
what is the principle of this assay?
principle of this assay:
2 major reactions occur in this assay
1. proteins are held together by peptide bonds. upon exposure to copper ions (Cu2+), the peptide bonds will reduce Cu2+ to Cu+. this reduction process is temperature dependent. this also means that, the more proteins you have in the solution, the more copper ions are reduced to Cu+.
2. BCA molecules will bind to Cu+, resulting in the formation of a purple-coloured product. the colour intensity of this product is then measured at wavelength 562nm using a plate reader. (colourimetic assay)
how does the assay work?
the assay usually comes in a kit. inside the kit, you can find: BCA reagents A and B, 96-well flat bottom plate, Bovine . Albumin (BSA) standards.
BSA standards: as the name suggests, BSA is a serum albumin, and we all know that albumin is a protein. so the BSA standards serve as a control for the kit (standard control). the BSA concentration that the company provides is usually 2mg/ml (2000ug/ul). to get a series of concentrations, we dilute the BSA (from high concentration to low).
Range of concentration of BSA diluted: from 0mg/ml to 2mg/ml. usually we can have up to 6-7 standards inclusive of 0mg/ml. BSA is diluted in ultrapure water (Milli-Q water).
Eg,
well A: 0 ug/ml (no BSA standard) /BLANK
well B: 131.072 ug/ml BSA
well C: 262.144 ug/ml BSA
well D: 327.68 ug/ml BSA
well E: 409.6 ug/ml BSA
well F:512 ug/ml BSA
well G: 640 ug/ml BSA
well H: 2000 ug/ml BSA
next, we prepare the BCA working reagents .
BCA working reagents = Reagent A + Reagent B (in ratio 50:!)
reagent A is colourless, reagent B is blue in colour.
one important thing to note is that the working reagent must be prepared freshly prior to use and stored at 4 degrees celsius. Do not keep overnight.
upon adding reagent B, the solution immediately turns GREEN. mix well.
the next component we will require is THE BUFFER. this buffer, simply refers to the the buffer we use in our samples. eg, if the samples are cells, then the buffer is the cell culture medium.
steps:
1. Add 20 ul of BSA standards to the individual wells.
2. Add x ul of sample to each well.
3. Add x ul of buffer to the wells that contain BSA standards.
4. Add 20 ul of Milli-water to the wells that contain samples.
Steps 3 and 4: This is to eliminate disturbances caused by any possible absorption by the buffer when measuring the absorbance of samples. Similar reason applies to adding 20uL of water into the samples’ wells.
5. Add (200-20-x) ul of BCA working reagents to all the wells.
- therefore total volume in each well: 200 ul.
-upon adding, you will find that the solution turns purple in the presence of proteins
6. Mix well, by pipetting up and down.
7. Cover the plate.
8. Incubate at 37 degrees celsius for 30 minutes.
- before reading on the plate reader, ensure that there are no bubbles. the presence of bubbles will affect the reading.
9. Read at wavelength 562 nm.
Simple? Yeah.
Any alternatives?
some of you may have used before the bradford assay. For those who have not, bradford assay is an alternative to BCA protein assay. (Read here for more information on bradford assay (wiki) : http://en.wikipedia.org/wiki/Bradford_protein_assay )
BCA protein assay is better than bradford as:
1. more sensitive compared to bradford assay
that's all! (:
LIM JIA HUI (JOEY)
0703605f tg01
group 2
Sunday, October 4, 2009
CK-MB test
Creatine kinase (CK) is a dimeric enzyme which occurs in four different fours: a mitochondrial isoenzyme and CK-MM( muscle type), CK-BB (brain type) and CKMB.
The determination of CKMB is an important element in the diagnosis of myocardiac ischemia. CKMB is detectable in the blood about 3-8 hours after the onset of cardiac symptoms and can be detectable over a period of time which is dependant on the course of the condition.
Test principle
Sandwich principle
- 1st incubation: 15uL of sample, a biotinlylated monoclonal anti CK-MB antibody, and a monoclonal CK-MB specific antibody labeled with a ruthenium complex react to form a sandwich complex.
- 2nd incubation: After addition of streptavidin-coated microparticles, the complex becomes bound to the solid phase via interaction of biotin and streptavidin
- The reaction mixture is aspirated into the measuring cell where the microparticles are magnetically captured onto the surface of the electrode. Unbound substances are then washed away.
- Results are determined bia a calibration curve which is instrument-specifically generated by 2 point calibration and a master curve provided via the reagent barcode.
Note: The entire test is done using the analyzer (Cobas e) and the test principle can be found inside the CK-MB kit.
Stanley
Wednesday, September 30, 2009
G6PD qualitative screening test
Physiological role
G6PD is a key enzyme in the hexose monophosphate pathway (HMP) and is required for the formation of NADPH. NADPH is essential for maintaining the integrity of the erythrocyte membrane.
Specimen collection and preparation
- Process specimen collected in EDTA tube
- Before analysis, check that the specimen is not clotted
Clinically significance
G6PD deficiency may be cause of hemolytic disease of newborns in Asian Mediterranean. Drug-induced hemolytic anaemia is most commonly associated in erythrocyte deficiencies of G6PD.
This deficiency is due to presence of a labile G6PD enzyme that is present in young cells but rapidly disappears with cell aging. A range of variant defective enzymes have been found in different racial group.
Performing G6PD screening test by R&D diagnostic G6PD deficiency screening test kit
- Label a filter paper (in test kit) with the running number
- Label 4 spaces in filter paper for Blank, Normal, Intermediate and Deficient control
- Pipette 100µ of substrate into all the tubes. Substrate must be at room temperature for test
- Mix the Normal control (a previous day’s specimen with G6PD present). Pipette 5µl into its labeled test tube containing the substrate, mix and immediately start the timer
- Using a sufficient time interval between sample, mix the Intermediate control and likewise pipette 5µl into its labeled test tube of substrate and mix.
- With the same time interval between samples, pipette the Deficient control and test samples accordingly
- When the timer reaches 10minutes, mix and pipette 10µl of the Normal control mixture onto its labeled portion on the filter paper
- Following the same time interval between samples, likewise mix and pipette the Deficient, Intermediate controls and the rest of the samples into their labeled position on the filter paper
- Pipette 10µl of the working substrate onto the position labeled “Blank”. Allow filter paper to dry completely and place it in the ultraviolet viewing cabinet
- Close the “Frontal Access Door” and switch on the “Long wave switch”
- View fluorescent through the viewing port which has ultraviolet absorbing filter to protect the eyes and increased fluorescent contrast
- Specimen from patient with normal G6PD activity will show strong fluorescence. Failure to fluorescence after 10minutes incubation suggests a total lack or marked deficiency of G6PD
- Strong fluorescence as compared to the intensity of the positive control, report as present. Report doubtful for weak or no fluorescence as compared with the intensity of the Intermediate deficient control
- Check doubtful specimen for blood clots
o If clot, repeat test with new specimen
o If no clot, repeat test
o All doubtful specimen are required to do G6PD quantitative determination
Yeo Sok Kian Jocelyn
0703359J
Monday, September 28, 2009
Freezing of cells
Cell freezing is done if the cell type used is rare or for storage purposes or for transport. It is a very simple procedure, only require a few steps.
Protocol (For freezing 1ml)
1. Trypsinize cells
2. Count cells
3. Resuspend cells with medium (Cell density should be ~50 000 - 1 000 000 cells/ml)
4. Add 900ul of cell suspension and 100ul of (Dimethyl Sulfoxide)DMSO into a cryovial.
5. Freeze at -80 degree celsius or -196 degree celsius.
Note: DMSO acts like a cryoprotectant which prevents damage arising from freezing.
Alvin
Tuesday, September 15, 2009
Biochemistry Lab
Hi there, I am here to share again, and I would also like to apologise for the late posting!
Fecal Occult Blood Test
This test is a non-evasive test that detects occult (hidden) blood in the stool samples. The occult blood test can be used to screen for any bleeding along the gastrointestinal tract and also for colon cancer.
Materials used:
Hemoccult Sensa Test Kit which comprises of 2 main component:
1) Hemocult Sensa Slides : Test cards containing the guaiac paper.
2) Hemocult Sensa Developer: A developing solution that contains a stabilized mixture of hydrogen peroxidase (42%), 80% ethyl alcohol and enhancer in aqueous solution.
Principle of Test:
The Fecal Occult Blood test is based on the oxidation of guaiac by hydrogen peroxidase into a blue compound. The heme portion of hemoglobin (if present in the fecal specimen) has peroxidase activity which will catalyze the oxidation of alpha-guaiaconic acid (an active component of the guaic paper) by hydrogen peroxidase. Hence, forming a highly conjugated blue quinone compound.
Method:
 1) Label the test card with the patient's sticky label
 2) Open up the test card, there will be 2 boxes A and B.
 3) Using the wooden applicator, collect a small amount of fecal sample of the patient.
4) Apply a thin smear in box A.
5) Re-using the same applicator, obtain a second sample from a different part of the fecal sample. Apply a thin smear in Box B.
6) Close the cover flap and flip the card backwards. 7) Open the flap on the back of the card. There will be (i) an area to allow the developer to drop
directly on the smear, (ii) a Performance monitor area that consists of a positive and negative control.
 8) Apply 2 drops of the Hemoccult SENSA Developer onto the guaiac paper directly over the smears.
9) Apply 1 drop of the Hemoccult SENSA Developer between the positive and negative performance monitor areas. Results:
10) For the test, results must be read within 60 seconds. Any trace of of blue at or on the edge of the smear, the test is considered positive for occult blood.
11) For the performance Monitor, results have to be read within 10 seconds. If the test slide is functional, a blue colour will appear on the positive performance monitor area and no blue for the negative performance monitor area.
* In this case, the test card is functioning well, and the test is negative for occult blood. i.e the patient do not have occult blood.
Note
To avoid false positive results:
*Sample should not be collected when patient is having menstruation.
*Patient should aviod taking red meat (beef, lamb, liver) 3 days before stool collection.
*All pictures are taken and posted after permission granted by my supervisor.
Posted By: Tan Siew Ming
0702862D
Thursday, September 3, 2009
viability (live/dead) staining
Hi everybody!! It’s me again!
Today, I would like to share with you guys how to perform Live/Dead Staining! This is a viability assay, similar to the process that Stanley has discussed in his post. However, this is not a quantitative assay.
I am using fluorescence to detect live / dead cells.
Concept
Live cells are capable of metabolism, therefore we add Calcein AM. Calcein is a fluorescent dye, and Calcein AM is the acetomethoxy derivate of calcein. Calcein AM is able to enter cells through intact cell membrane and thus is capable of determining live cells. Intracellular hydrolase enzymes (or intracellular esterases) will hydrolyze AM, and release green fluorescent anion calcein. This calcein will be retained in the cytoplasm of cells. Under fluorescence, a green cell is observed. On the other hand, when cells die, the plasma membranes of these cells are compromised. Hence AM will not be hydrolyzed. Instead, Ethidium homodimer-1 (EthD-1), is added. EthD-1 is also a fluorescent dye which will enter cells with compromised cell membrane. The dye will then bind to DNA in the nucleus. As EthD-1 is red in colour, it will give a red fluorescent under fluorescence.
We store them in 4oC. Since these are fluorescent dyes, they are sensitive to light. Hence when we add these chemicals to cells, we perform the experiment in the dark and cover in aluminium foil.
Calcein AM is diluted with cell culture medium/solution à 0.5ul/ml of solution (depending on what type of cells you using)
EthD-1 is diluted in cell culture medium/solution à1ul/ml of solution
Eg
- 1. Add 1ml of media to each well containing cells.
- 2. Add the dyes to cells. (Calcein AM: 0.5ul / EthD-1: 1ul)
- 3. Incubate at 37oC for 20-30 minutes.
- 4. Observe under fluorescent microscope.
Here 2 pictures for you guys to enjoy!
apparently blogger is down AGAIN, so it doesn't let me post pictures!
so here are the hyper- links instead.
Figure 1: http://i201.photobucket.com/albums/aa29/sakura_1990/Image16.jpg
Figure 2: http://i201.photobucket.com/albums/aa29/sakura_1990/Image47.jpg
(here's the direct link if the above hyperlink doesn't work)
Figure 1 shows it all. There is live cells and going-to-die cells. As u can see from cell number 2 from the left, there is a portion of red fluorescent. This indicates that the cell membrane is compromised/ or cell has burst. This indicates that the cell is probably dead.
Figure 2: More obvious dead cells.
hopefully u guys can see the links. if there's any trouble, do leave a comment. I'll get back as soon as possible.
(the photos are released with permission).
posted by LIM JIA HUI (: tg01 0703605F
Wednesday, August 26, 2009
MTT assay
Hello, i am Stanley and this is my second blog posting.
Labeling of cells
 (Before adding the MTT stock)
3) Add 10µL of MTT stock to each well ( The wells will turn to a slight yellow in colour)
4) Incubate at 37 Degrees Celsius and 5% carbon dioxide concentration for 4 hours (1st incubtion)
5) After incubating the plates for 4 hours, remove all but 25 µL medium from each well
6) Add 50µL of DMSO into each plates
7) Incubate the plate for the second time at 37 Degrees Celsius and 5% carbon dioxide concentration for 10mins (2nd incubation)
 (After the second incubation)
Absorbance reading
8) Read the absorbance at 540nm using a microplate absorbance reader
Thank You
The MTT assay is a quantitative colorimetric method used to determine cell proliferation. It utilizes the yellow tetrazolium salt which is metabolized by mitochondrial succinic dehydrognase activity of proliferating cells to yield a purple formazan product. This purple formazan is then solubilized and the concentration is determined by reading under an optical desity which ranges from 500nm to 600nm. As the MTT assay only detects living cells, it can be use to measure cell cytotoxicity, proliferation or even activation.
Part of my experiment will include the use of MTT assay to determine both the growth curve of both normal lung cell (MRC-5) and large lung carcinoma cells (H460) which are seeded in a 96 well flat bottom plate. The advantages of using MTT will include high accuracy and the exclusion of using radioisotope.
Below are steps for performing the MTT proliferation assay:
Preparation of MTT stock
1) Adding 1ml of sterile PBS into the 5mg vial of MTT
2) Votex the mixture till all of the MTT is dissolved (takes approximately 3 to 5mins to dissolve completely)
(Note: the MTT stock can be stored for four weeks at 4 degrees celsius protected from light)
Labeling of cells
(Before adding the MTT stock)3) Add 10µL of MTT stock to each well ( The wells will turn to a slight yellow in colour)
4) Incubate at 37 Degrees Celsius and 5% carbon dioxide concentration for 4 hours (1st incubtion)
5) After incubating the plates for 4 hours, remove all but 25 µL medium from each well
6) Add 50µL of DMSO into each plates
7) Incubate the plate for the second time at 37 Degrees Celsius and 5% carbon dioxide concentration for 10mins (2nd incubation)
(After the second incubation)Absorbance reading
8) Read the absorbance at 540nm using a microplate absorbance reader
The above steps is a quick alternative to the conventional steps which uses SDS sodium dodecyl sulfate - HCL solution instead of DMSO to solubilize or dissolve the purple formazan. However, the conventional steps will require an addition of 4 to 18 hours of incubation time ontop of the first incubation stated in step 4 and has to be read at 570nm instead of 540nm.
Some important points to note are that:
1) DMSO is a powerful solvent and is able to rapidly penetrate the skin and it is important to avoid skin contact with DMSO
2) Both DMSO and the MTT stock are sensitive to light and must be kept away from light to prevent degenerative effects or inaccuracy
Thank You
slide making
hihi, im going to share about slide making of blood specimen for chromosome study.
when the blood culture is ready for harvesting...
1. centrifuge the tube of cell suspension at 1200rpm for 10minutes
2. remove the supernatant and resuspend the cell pellet with fresh fixative
[do not cause too much mechanical disruption to the cells]
3. centrifuge the tube at 1200rpm for 10minutes
4. place the tubes ready for slide making in a rack and prepare a clean recycle tube with pipette for each tube in a rack
5. remove the supernatant into the recycle tube, leaving a suitable amount of fixative to resuspend the cell pellet
6. take a slide from a beaker in the fridge and flick to remove excess water leaving an evenly thin coat of water on the surface of the slide.
7. hold the pipette approximately 1-2 inches above the slides
[tilt the slides at about 45 degree angle]
8. gently drop the cells suspension on the slide
9. dry the sides and edge of the slide and leave it at room temperature to dry
10. check the mitotic index and spread length under the microscope
11. bake the slides at 90 degree celsius for approximately 1 hour 30 minutes
Factors affecting slide making
a) Proportion of fixative
if the metaphases does not spread well, use a higher proportion of acetice acid to methanol. this will soften the cell "sac", thus chromosome spread is better. however, this must be handled carefully as increase amount of acetic acid can cause staining problem later on.
b) Cell density
if the cell density is low, make a denser cell suspension by resuspending the cells with a lesser volume of fixative and vice versa.
c) Temperature of slides
warm slides allow more spreading, thus use it when the spreading is tight. cold slides prevent over spreading of the chromosome. however, cold but dry slides is used to prevent further spreading of the chromosomes. it is normally use when cells are "severely broken".
d) Aging of slides
slides can be sged at 90 degree celsius for 1hour 30minutes or 60-65 degree celsius ovenight.
e) Angle of slides
the angle of the slides is adjusted according to the condition of the metaphase. for example, a steeper angle will create a greater flow direction, thus enhanced the spreading.
by,
yeo sok kian jocelyn
0703359j
Tuesday, August 25, 2009
Staining
This method of staining is called immunostaining. It makes use of antibodies, primary and secondary.


The yellow box shows the ZO-1 protein that I'm talking about. The reddish thing is the cytoplasm, which is overstained. But for the image below, the distinct red lines are the ZO-1 proteins. The green stain is type IV beta-tubulin stain, according to the website.
This is a rather simple but tedious task. The steps are:
1. Fix cells using 100% ethanol. (This is to prevent the cells from washing off, during the wash step)
2. Incubate for ~20 minutes in the freezer.
3. Remove ethanol and wash thrice using PBS.
4. Add 4% blocking solution and incubate for 1hour on rotator at room temperature. (Blocking solution used here is just BSA, bovine serum albumin)
5. Wash thrice using PBS to wash off any unbound BSA.
6. After 1 hour, add primary antibody (Dilution ratio--> Ab: BSA = 1:100) and incubate on rotator for 1hour at room temperature/incubate overnight in freezer.
7. Wash thrice with PBS to wash off any unbound primary Ab.
8. Add secondary Ab (Dilution ratio--> Ab:PBS = 1:100) and incubate for 1 hour on rotator at room temperature.
9. Wash thrice with PBS.
10. Add DAPI and incubate for 5mins on rotator at room temperature.
11. Wash thrice and proceed to view under fluorescent microscope.
Note: DAPI stains for DNA(Nucleus). It will appear blue under microscope.
The antibodies that i use are:
1. Rabbit anti-ZO-1 (Primary Ab)
2. Alexa Fluor 594 goat anti-rabbit IgG (Secondary Ab)
Rabbit anti-ZO-1 will bind to the ZO-1 protein. This ZO-1 protein can be found only when the cells are in contact with each other.
Alexa Fluor 594 goat anti-rabbit IgG is derived from goat and binds specifically to rabbit Ab. Therefore, when the above two Ab are used together, Alexa Fluor 594 goat anti-rabbit IgG will binds to rabbit anti-ZO-1. When view under microscope, the protein will appear red.
Below are some of the photos i taken using the microscope:
Note: Permission were taken from my mentor before the posting of these images, except for the last image. The last image was taken from website: http://www.biotechniques.com/BiotechniquesJournal/2007/August/Murine-nasal-septa-for-respiratory-epithelial-air-liquid-interface-cultures/biotechniques-43042.html?pageNum=4


The yellow box shows the ZO-1 protein that I'm talking about. The reddish thing is the cytoplasm, which is overstained. But for the image below, the distinct red lines are the ZO-1 proteins. The green stain is type IV beta-tubulin stain, according to the website.

Reference:
BioTechniques, 2009. Retrieved on 27 August 2009 from website: http://www.biotechniques.com/BiotechniquesJournal/2007/August/Murine-nasal-septa-for-respiratory-epithelial-air-liquid-interface-cultures/biotechniques-43042.html?pageNum=4
Alvin
Friday, August 7, 2009
Hematology (:
Hey people! This is Siew Ming here to post again (:
I am going to post about my experience when I was attached to the Hematology lab.
Basically, the hematology lab is being divided into two sections: 1) Stat lab where emergency samples were being handled and 2) Routine lab whereby routine processing of blood samples are carried out.
I got the chance to observe and participate in the various tests that are carried out in the lab, such as FBC, ESR, reticulocyte Test, Kleihaur Batek Test and APPT/PT. Besides these, I felt fortunate to be taught to recognize and differentiate the different types of blood cells under the microscope by a very senior med tech! (:
Today, I’m going to share about the techniques of Erythrocyte Sedimentation Rate (ESR). ESR is a screening test used to detect inflammation. However, confirmatory tests have to be carried out to confirm the diagnosis. ESR refers to the rate at which the red cells sediment over time. It is often measured in mm/H. ESR will increase when there is infection, pregnancy, SLE, Anaemia, etc.
For a single ESR test, a minimum of 350ul of venous blood will be collected in an EDTA tube. Before performing the test, it is very crucial to check for visible clots of the blood. This is because clotted samples cannot be processed and the results will be inaccurate and not valid.
Steps:
1. EDTA blood sample is mixed well by inverting the tube several times.
2. 320ul of blood from the EDTA tube is transferred into a Aquisel Tube (filled with Trisodic Citrate 0.106M)
3. The Aquisel tube is then mixed for at least 12 times.
4. A pipette is then introduced into the Aquisel tube through a twisting the pipette in a circular motion, and gradually push the pipette downwards to allow blood to fill the pipette. The blood level should reach the “0” marking on the pipette.
5. The pipette, together with the Aquisel tube is left to stand on a Styrofoam Aquisel Tube holder for 50 mins.
6. Results (no. of mm the cells have fallen) were read at the end of 50min.
7. Results were then recorded into the ESR record book, patient’s request form and LIS verification system.
The expected ranges should be:
Neonates (1-2days): 0-4
Neonates (3 days-1 month), children (2 months – 12 years), and adults (more than12 years): 0-10
I think there is something wrong with blogger these few days. As it doesn’t allow me to post pictures, here’s a link to show how do Aquisel tubes and pipette look like: http://www.swissvacuum.com/products/selecta/Biology_and_histology_equipment/DivisionAnalytique.pdf
Tuesday, July 28, 2009
Culturing MRC-5 cell lines
Hello, i am Stanley and i will be doing my very first blog posting. I am sorry for the delay as i have only started my experiment this week. I have managed to perform some simple experiment today and i will like to share my experience with you guys. These experiments were done in a bio safety level 2 laboratory and are related to Mammalian cell technology (MCT).
The aim of major project is to evaluate the effect of green tea on large lung cancer cells. I am given two different cell lines which are namely the MRC-5 cell line ( healthy lung cell) and the NCI-H460 ( large cell lung cancer). Both cell lines are previously purchased from ATCC and are both in passage number 2 when they are given to me. The objective for today's experiment is to culture both cells in their respective media therefore allowing healthy cell growth and expansion.
First of all, i will have to prepare the respective media for each cell lines. I will be stating the steps involved in preparing the modified Dulbecco's modified eagle media (DMEM), which will be use to culture the MRC-5 cells.
The steps to prepare 1 litre of DMEM are:
1) Thawing of the Fetal bovine serum(FBS), L glutamin, penicillin streptomycin, sodium pyruvate
in a 37 Degree Celsius water bathe.
2) Dissolve 1 packet of DMEM powder and 37g of sodium bicarbonate into of 1 litre ultra pure
water.
3) Add 10ml of penicillin streptomycin
4) Add 10ml of L- glutamin
5) Add 10ml of sodium pyruvate
6) Add 50ml of FBS
7) Filter sterilize
Although the above steps might seem simple and rather straight forward. I made a mistake of introducing too much bubbles which resulted in overflowing of media into the electric vacuum. Although, i had learnt how to filter sterilize DMEM media in Mammalian cell technology. The modified DMEM media is completely different as it contains 10% FBS and many other constituents. I later learnt from my supervisor that the presence of FBS is the main reason behind the large production of bubbles.

Following the preparation of DMEM media, i am ready to culture my MRC-5 cells. The steps are as followed:
1) Pipette a small amount of DMEM media into a centrifuge tube
2) Pipette 2 tubes of MRC-5 cell line into the centrifuge tube
3) Centrifuge it at 1000 rpm for 5mins
4) Pipette out the supernatant
5) Add 20ml of DMEM media to resuspend the cells
6) Pipette the resupended cells into a T75 flask
There are a few key points to note while culturing cell
7) Incubate the culture under 5% Co2 level at 37 Degrees Celsius
While culturing fragile cells for example the MRC-5. We will have to ensure that the media is properly warmed to around 37 Degrees Celsius which is near to our body temperature before it can use to culture the cells. Similarly, no bubbles should be present in the culture as this might lead to cell death.
Strict aseptic techniques have to be observed throughout the whole experiment as any contamination will results in the discarding of media or materials. It is rather scary as my supervisor had previously ordered the materials in week 2 but the it only arrive on week 6 of my major project.
Here are how both cells look like under an inverted microscope.
Mrc-5 cells--------------------->
H460 cells ----------------->
Thank you
Thursday, July 23, 2009
Islet isolation (:
Hi! I'm back for episode 2!
Isolation of pancreatic islets from mice

Retrieved from BBC (2008). Scientists make weight loss claim. Retrieved on 01st July 2009, from: http://news.bbc.co.uk/2/hi/health/7372495.stm
For this experiment you will need these few things:
White mice, Anaesthesia, Surgical Scissors, surgical wire, Forceps, Syringe, Needle, Tube, Collagenase solution.
A total of 4 mice were used in this experiment. The mice were making a lot of noise and they kept moving around! They almost had the strength to push open the styrofoam cover and even tried to escape.
My senior picked up the mouse by its tail, and tried to hold up its head by its ears in between her thumb and index fingers and held the tail using her last finger. Basically, the mouse was immobilized by a hand. The other hand was used to inject the anaesthetic into the mouse’s abdomen. This has to be done carefully. If injected wrongly, this may cause the mice to die earlier, which will be no good for the experiment.
As you guys know, mouse is very small. Therefore my mentor used a binocular microscope for easier visualization. To ensure that the mouse is really asleep, she will pinch its legs to check for reaction. No reaction would indicate the mouse is asleep. Next, she used a surgical scissors to cut open the abdomen, and exposed its contents.Do you know that a mouse’s liver is really big? At first, I thought the liver was the lung! Below the liver is the pancreas. First, my mentor skillfully tied up the bile duct with the surgical wire. Tying up the bile duct before injecting collagenase into the mice ensures that collagenase will only be injected in the pancreas. If not, collagenase solution will flow into the stomach and intestine, therefore the pancreas will not swell up. Next, she carefully inserted a small tube which contains collagenase into the bile duct. Collagenase is used to digest the external cells. Once collagenase is pumped into the pancreas, the pancreas starts to swell up. I once thought that the pancreas is green in colour, but actually it is quite yellowish-transparent. Once the entire amount is injected in, the tube was carefully removed and pancreas was removed and placed in a tube containing collagenase. The tube was then placed in 37*C waterbath. After the removal of pancreas, the mouse would die a few minutes later.
However, my observation did not stop here. As my senior needed to collect blood for her experiment, I watched as she inserted the needle into the mouse’s really small heart and took the small little amount of blood. It was really weird, as during the procedure, the mouse would have reflex action, almost like the mouse is having hiccups.
Although I wouldn't have a chance to ever cut the mouse open, but this has been a great experience, though this isn't and will not be my first and my last.
Lim Jia Hui (JOEY)
0703605F
Monday, July 20, 2009
Microbiology - questions asked
hihi.. sorry for the late reply. i didnt know the response was so overwhelming. hahaha..
please read on.... =)
to Jess
Question: does Salmonella appear black on all agar
No. it appear black only on XLD (Xylose lysine deoxycholate) plate.
Question: how does E.coli and Acinetobacter baumanii appears on the agar that differs from Salmonella
Both Salmonella and Acinebacter baumanii is non-lactose fermenter. Whereas E.coli is a lactose fermenter. Therefore Macconkey plate can be used to differentiate the lactose fermenter from the non-lactose fermenter. Inorder to differentiate the three different types of bacteria, perform biochemical test.
to Siewming
Question: what is Tip specimen
when patient with dextrose drip, central venous catheter, or any form of needle attaching to body, shows signs and symptoms of infection (eg. fever), blood FEME is usually done. when the blood FEME shows that there is bacteria growth or high amount of WBC present,
it means positive for infection. Hence it might be due to tip contamination, which is contamination of the needle or even the tubing. Thus, part of the tube is cut and send for comfirmation.
Question:is there a need to culture different type of stool on different type of agar plate.
Yes. different form of stool formed is due to different bacteria. Hence, with a standard protocol in the lab, different type of agar plate is used so to select and maximise the growth of the target bacteria.
to Jordan
Question: is it a must to streak on TSA plate then Macconkey plate for urine specimen.
Yes, Macconkey agar is a selective agar which may inhibit the growth of certain organism. thus if we streak on Macconkey agar first, we might transfer some of the nutrient in the Macconkey to the TSA plate which may inhibit the growth of certain organism. this may lead to inaccurate result as there might be more than 1 organism present.
to Jeremy
Question: what does XLD stands for and its uses in stool culture
XLD stands for Xylose Lysine Deoxycholate agar. Basically it is use to isolate Salmonella and Shigella.
Question: why does Hemophilus Influenza (HI) unable to grow on blood agar and is there any way to establish growth of HI on blood agar
HI does grow on blood agar only with the presence of Staphylococcus streak. this is bacause, Staphlococcus streak contains the X and V factor with enhance the growth of HI.
Question: what is the significance of detecting MRSA in people.
The only antibiotic that can treat MRSA is vancomycin. Given that vancomycin will damage the kidney function of neonates, it is very crucial.
to Lok Pui
Question: why do we need to do cell count for urine specimen
FEME is done to support the report. For instance if there is bacteria growth on the agar plate but there is no WBC observe under the microscope, it could be due to contamination of the agar plate. Hence urine FEME serves as a countercheck for the results.
Question: how to culture solidfy stool
Solid stool doe not undergo any dilution in broth. A stick is use to scrap abit of the stool, then it is smear on the agar plate.
Question: what kind of specimen is used for ear culture
For ear culture, ear swab is obtain.
(extra info: ear culture is done more commonly in newborn to screen for Group B Streptococcus that may be pass on from the mother.)
to Liyana
Question; how germ test is performed to confirm for Candida Albicans
In germ test, rich plasma is supplied. Only Candida Albicans is able to grow germ tube within 24 hours.
this is a picture of germ tubes of Candida Albicans
(adapted from http://en.wikipedia.org/wiki/Germ_tube)
to Janice
Question; do we use different plate for different form of stool
Yes, we do use different plate for different form of stool. (for more information, can refer to the post that i wrote)
Question: do we put ear specimen on cook meat
Nope. we only use CDC and Macconkey without salt agar plate.
Question; for Salmonella found on plate, how do we identify
we do a serotyping to confirm which group of Salmonella it belongs to. In this test, Salmonella Antisera is used. There is a total of 9 different group of Salmonella. In order to perform the serotyping, ensure that bacteria looks homogenous and no autolysis occurs. Next, one colony is treated with PO and PH, a bacteria antigen. PH is a test against flagella . Both PO and PH must be positive to ensure that the bacteria is a Salmonella species. Commercial reagent is then used to test for the group.
for those questions on the chat box, so sorry, i didnt realise there were questions over there. hence its not included in this post. will reply soon !! =)
bye bye..
JOCELYN =D
Tuesday, July 14, 2009
Building your very own bubble trap
This post is posted by Alvin Tan, 0703829B.
I have learnt to build my own bubble trap, instead of buying pre-made ones available on the net. My bubble trap design looks something like the bottom diagram.


Principle:
The inlet will allow water to flow into the trap itself. With the air space in the vial, any bubble will will join with the air and be eliminated. Water will drop and exit via the outlet.
The filter has a pore size of 0.45um. It will block off most bacteria but not viruses. However, a filter of 0.45 pore size is enough for my experiment. This filter can be changed according to your preference.
Things needed:
1. Filter
2. Cryovial
3. Connectors
4. Forcep
5. Needle
Steps:
1. Using the needle, punch 3 holes on the cryovial. 1 on the top of the cap, 2nd at the bottom of the vial and 3rd at the side.
2. The holes wont be big enough for you to fit the connectors and filter in. Therefore, use a forcep to enlarge it manually. Which means, just dig and dig till the hole becomes big enough to fit.
3. Fit the filter and connectors and then the tubings and you get your own bubble trap.
Alvin
0703829B
14 July 2009
I have learnt to build my own bubble trap, instead of buying pre-made ones available on the net. My bubble trap design looks something like the bottom diagram.
Principle:
The inlet will allow water to flow into the trap itself. With the air space in the vial, any bubble will will join with the air and be eliminated. Water will drop and exit via the outlet.
The filter has a pore size of 0.45um. It will block off most bacteria but not viruses. However, a filter of 0.45 pore size is enough for my experiment. This filter can be changed according to your preference.
Things needed:
1. Filter
2. Cryovial
3. Connectors
4. Forcep
5. Needle
Steps:
1. Using the needle, punch 3 holes on the cryovial. 1 on the top of the cap, 2nd at the bottom of the vial and 3rd at the side.
2. The holes wont be big enough for you to fit the connectors and filter in. Therefore, use a forcep to enlarge it manually. Which means, just dig and dig till the hole becomes big enough to fit.
3. Fit the filter and connectors and then the tubings and you get your own bubble trap.
Alvin
0703829B
14 July 2009
Sunday, July 12, 2009
Microbiology Lab
JOCELYN YEO 0703359J
I was attached to microbiology lab for three days.
Upon receiving specimen, all request form is needed to clot in time of arrival in the lab. This is for tracibility and also to track the turn around time. Specimens received are sort according to high vaginal swab (HVS), ear swab, methicillin-resistant staphylococcus aureus (MRSA), urine specimen, blood specimen, Tip specimen and stool specimen. Before processing the specimens, we are suppose to check patient information labelled on the specimen against the request form. Different specimen will require different condition, procedure and agar plate for incubation. After incubation, medical technologists will read and type the result in a computer system.
Urine processing
Macconkey without salt and TSA blood agar plate is used to culture.
Shake the bottle of urine. Dip the 1µl disposable innoculation loop into the bottle. The loop should not be dipped all the way to the bottom. Then streak on the TSA blood agar first. Dip the same innoculation loop into the urine specimen again and streak on the Macconkey agar. Next, use a capillary tube to draw the urine and insert it into the disposable hemocytometer for cell counting.
Method to streak for urine specimen.
Stool specimen
Different form of stool specimen is needed to culture on different agar plate.
1. Formed or loosed stool : XLD, campylobacter plate and selenite F broth
2. Watery stool : XLD, campylobacter plate, selenite F broth, TCBS, TSA blood agar and alkaline peptone water
3. Bloody stool : (select mucus or blood flecked material to culture) XLD, campylobacter plate, selenite F broth, CIN, Macconkey sorbitol agar.
4. Stool from BMT or oncology patient : XLD, campylobacter plate selenite F broth, blood with gentamicin, blood agar, Macconkey plate and VRE plate.
5. Request for aeromonas or pesiomonas culture : XLD, campylobacter plate, selenite F broth, blood plate.
6. Request for VRE and ESBL screening : VRE plate and gentamicin blood agar plate.
(Macconkey sorbitol is to look for E.coli 0157 and campylobacter plate is to look for campylobacter.)
7. Rotavirus tested by using a commercial kit. Before test procedure, ensure test kit is at 20-25 degree celsius for optimum result. Add 1µl of diluent to 100µl of stool specimen and mix it. Allow sedimentation for 3 minute. Pipette 4 drops of mixture into the cassette. Read the result after 5 minutes. Inorder for the result to be valid, the control must be positive.
Ear culture
Culture on CDC and Macconkey without salt agar plate.
Wound specimen
Blood agar and Macconkey agar plate is used for superficial wound specimen. An additional CDC plate is needed for deep infection to check for anaerobic bacteria.
Tip specimen
Only blood agar plate is used as the aim is to check for any bacteria growth.
Upper respiratory system
Streak on blood plate and chocolate agar.
(chocolate agar is an enrichment media, hence Hemophilus influenza is able to grow.)
Endotrachel Aspirate (ETTA)
Culture on blood agar and Macconkey agar.
Subchronic specimen
This include specimen such as placenta, womb, etc.
Blood agar, Macconkey agar plate and CDC plate is used.
Sterile specimen
For all sterile specimen, gram staining must by carried out and analyze before plate reading.
1. CSF : Culture on blood agar, chocolate agar and CDC plate. (specimen is kept 3 days)
2. Pleural fluid : Culture on blood agar, chocolate agar, CDC plate and Macconkey agar.
3. Tissue (eg. lymph node) : Culture on blood agar, Macconkey agar and CDC plate.
4. Endocervical : Culture on Thayermartin media (MTM)

Method to streak for miscellanous specimen (all specimen except urine)
Results
Urine
1 colony is approximately 1000cfu/ml. If there is less than 10 colonies, report as no significant growth.
However, if bacteria is suspected to be yeast (candida) , perform wet mount and look under microscope. Germ test is then carry out if yeast is observed under microscope. Germ test is a test to confirm for Candida albicans.
Typical morphology of E.coli is flat, and lactose fermenter (pink on Macconkey plate). If bacteria is suspected to be E.coli, perform spot indole test by putting a drop of indole reagent on a strip of filter paper and scrap a colony. If colour changes to green, it is indole positve. Indole negative remain pink, hence send for identification of bacteria and susceptibility test.
Spot indole test should use colonies from the TSA plate as colonies on the Macconkey plate might be stained with colours thus affecting the result.
Stool
black colony may suggest Salmonella species. Other bacteria to look out for are E.coli and Acinetobacter baumanii.
Wound specimen
common bacteria are S. aureus, Group A Streptococcus, Pseudomonas aeruginosa and GMV.
Upper respiratory system specimen
look out for Streptococcus pneumonia, Hemophilus influenza and S. aureus.
Endotrachel aspirate (ETTA)
if Macconkey shows orange, it means the bacteria is a non-lactose fermenter, thus perform indole and oxidase test.
Colonies that look flat, spreading and metallic may suggest pseudomonas species. Thus perform oxidase test .
Catalyst test is to differentiate between Staphylococcus and Steptococcus species.
Ear specimen
look for Group B Streptococcus. There might be GMV and enterococcus.
Subchronic
look for gram negative bacteria.
MRSA
methicillin resistant organism will appear maurve colour (purplish pink) on MRSA select media.
If suspect methicillin resistant organism present, perform agglutination test with Bactistaph reagent. If Bactistaph reagent forms agglutinates with the colony, S. aureus is present.
I was attached to microbiology lab for three days.
Upon receiving specimen, all request form is needed to clot in time of arrival in the lab. This is for tracibility and also to track the turn around time. Specimens received are sort according to high vaginal swab (HVS), ear swab, methicillin-resistant staphylococcus aureus (MRSA), urine specimen, blood specimen, Tip specimen and stool specimen. Before processing the specimens, we are suppose to check patient information labelled on the specimen against the request form. Different specimen will require different condition, procedure and agar plate for incubation. After incubation, medical technologists will read and type the result in a computer system.
Urine processing
Macconkey without salt and TSA blood agar plate is used to culture.
Shake the bottle of urine. Dip the 1µl disposable innoculation loop into the bottle. The loop should not be dipped all the way to the bottom. Then streak on the TSA blood agar first. Dip the same innoculation loop into the urine specimen again and streak on the Macconkey agar. Next, use a capillary tube to draw the urine and insert it into the disposable hemocytometer for cell counting.

Method to streak for urine specimen.
Stool specimen
Different form of stool specimen is needed to culture on different agar plate.
1. Formed or loosed stool : XLD, campylobacter plate and selenite F broth
2. Watery stool : XLD, campylobacter plate, selenite F broth, TCBS, TSA blood agar and alkaline peptone water
3. Bloody stool : (select mucus or blood flecked material to culture) XLD, campylobacter plate, selenite F broth, CIN, Macconkey sorbitol agar.
4. Stool from BMT or oncology patient : XLD, campylobacter plate selenite F broth, blood with gentamicin, blood agar, Macconkey plate and VRE plate.
5. Request for aeromonas or pesiomonas culture : XLD, campylobacter plate, selenite F broth, blood plate.
6. Request for VRE and ESBL screening : VRE plate and gentamicin blood agar plate.
(Macconkey sorbitol is to look for E.coli 0157 and campylobacter plate is to look for campylobacter.)
7. Rotavirus tested by using a commercial kit. Before test procedure, ensure test kit is at 20-25 degree celsius for optimum result. Add 1µl of diluent to 100µl of stool specimen and mix it. Allow sedimentation for 3 minute. Pipette 4 drops of mixture into the cassette. Read the result after 5 minutes. Inorder for the result to be valid, the control must be positive.
Ear culture
Culture on CDC and Macconkey without salt agar plate.
Wound specimen
Blood agar and Macconkey agar plate is used for superficial wound specimen. An additional CDC plate is needed for deep infection to check for anaerobic bacteria.
Tip specimen
Only blood agar plate is used as the aim is to check for any bacteria growth.
Upper respiratory system
Streak on blood plate and chocolate agar.
(chocolate agar is an enrichment media, hence Hemophilus influenza is able to grow.)
Endotrachel Aspirate (ETTA)
Culture on blood agar and Macconkey agar.
Subchronic specimen
This include specimen such as placenta, womb, etc.
Blood agar, Macconkey agar plate and CDC plate is used.
Sterile specimen
For all sterile specimen, gram staining must by carried out and analyze before plate reading.
1. CSF : Culture on blood agar, chocolate agar and CDC plate. (specimen is kept 3 days)
2. Pleural fluid : Culture on blood agar, chocolate agar, CDC plate and Macconkey agar.
3. Tissue (eg. lymph node) : Culture on blood agar, Macconkey agar and CDC plate.
4. Endocervical : Culture on Thayermartin media (MTM)

Method to streak for miscellanous specimen (all specimen except urine)
Results
Urine
1 colony is approximately 1000cfu/ml. If there is less than 10 colonies, report as no significant growth.
However, if bacteria is suspected to be yeast (candida) , perform wet mount and look under microscope. Germ test is then carry out if yeast is observed under microscope. Germ test is a test to confirm for Candida albicans.
Typical morphology of E.coli is flat, and lactose fermenter (pink on Macconkey plate). If bacteria is suspected to be E.coli, perform spot indole test by putting a drop of indole reagent on a strip of filter paper and scrap a colony. If colour changes to green, it is indole positve. Indole negative remain pink, hence send for identification of bacteria and susceptibility test.
Spot indole test should use colonies from the TSA plate as colonies on the Macconkey plate might be stained with colours thus affecting the result.
Stool
black colony may suggest Salmonella species. Other bacteria to look out for are E.coli and Acinetobacter baumanii.
Wound specimen
common bacteria are S. aureus, Group A Streptococcus, Pseudomonas aeruginosa and GMV.
Upper respiratory system specimen
look out for Streptococcus pneumonia, Hemophilus influenza and S. aureus.
Endotrachel aspirate (ETTA)
if Macconkey shows orange, it means the bacteria is a non-lactose fermenter, thus perform indole and oxidase test.
Colonies that look flat, spreading and metallic may suggest pseudomonas species. Thus perform oxidase test .
Catalyst test is to differentiate between Staphylococcus and Steptococcus species.
Ear specimen
look for Group B Streptococcus. There might be GMV and enterococcus.
Subchronic
look for gram negative bacteria.
MRSA
methicillin resistant organism will appear maurve colour (purplish pink) on MRSA select media.
If suspect methicillin resistant organism present, perform agglutination test with Bactistaph reagent. If Bactistaph reagent forms agglutinates with the colony, S. aureus is present.
Sunday, July 5, 2009
Cytology Lab
Posted by: Tan Siew Ming 0702862D
Hey people! I'm here to share about my SIP experience of the 1st week! (:
As for the first 3 days of the first week, I was attached to the Cytology Department. Cytology is the analysis of cells to diagnosis diseases. The lab deals with 2 types of specimens : 1) Gynaecological Specimens and 2) Non-gynaecological Specimens.
Gynaecological specimens refer to Pap Smear of the cervix, while non-gynaecological specimens refer to fine needle aspirations (FNA) and bodily fluids collected.
Examples of the bodily fluids collected can be: Urine, Pleural, Pericardial and Peritoneal washings. And, FNA can be from the thyroid, lymph nodes, breast, bones, etc.
The routine process of the lab upon receiving the specimens is:
Maintaining of the specimens on the computer (that is to generate an access code/individual code for each specimen) -> generate the label sticker for labelling of the specimens-> processing ->staining-> mount-> screening of cells under the microscope.
1) Processing of Gynaecological specimens (Pap smears)
Pap smear is a screening test that determines any abnormalities of the cervical cells that may lead to cervical cancer. The aim of a pap smear is to detect any Cervical Intraepithelial Neoplasia (CIN) caused by the Human Papilloma Virus (HPV).
Basically, there are 3 different grades of CIN: CIN I- mild dysplasia, CIN II- moderate dysplasia, CIN III- severe dysplasia.
There are 2 ways if preparing and processing pap smears: 1) Conventional method, and 2) Liquid-based cytology.
The conventional pap smear method is carried out by collecting the cervical cells using a spatula or endobrush, then smearing the cells directly onto a glass slide. Next, the slide is fixed immediately with alcohol spray. This immediate fixing is to prevent drying artifact from happening. However, the conventional method is not widely use anymore because the smear may contain other debris like blood, mucosal or inflammation cells. Also, it produces a thick layer of cells that are overlapping each other, thus, affecting the efficiency and accuracy of the screening process.
These are the instruments involved in a ThinPrep Pap Test:

From left: Spatula, endobrush
Picture taken from: http://www.imvs.sa.gov.au/tissuepath/graphics/spatula_conventional.jpg

Broom-like Brush
Picture taken from: http://www.cervexbrush.com/images/CombiLong.jpg

Vial with preservative fluid
Picture taken from: http://www.labnews.co.uk/cms_images/Image/Prod-Dec-07/31-NOV.jpg

Inside of the ThinPrep Processor
Picture taken from: http://cyto.igabinet.pl/data/user_files/image/TP%20Processor%202.JPG

Slide produced from ThinPrep
Picture taken from: http://www.muliabrothers.com/Picture1TP.jpg

Difference in the quality of the slides produced by Conventional and ThinPrep method
Picture taken from: http://imaginis.com/graphics/cervical-cancer/pap_smear.gif
An endobrush, spatula or broom-like brush will be used to collect the cervical cells. After which, the brush will be rinsed vigorously in a vial containing preservative fluid. The vial will then be loaded into the ThinPrep machine for processing.
A suction filter will be inserted into the vial to filter the cells, separating the cervical cells from any debris, blood, mucosal or inflammatory cells. The cervical cells will then be imprinted on the glass slide. After which, the machine will gently drop the slide into 95% xylene for fixing. After fixation, the slides will go through pap staining in the autostainer, Leica Autostainer XL. The slides will then be mounted and screened under the microscope for any abnormalities.
2) Processing of Non-gynaecological specimens
The processing of non-gynae specimens is quite different from gynae specimens.
First of all, the specimens will undergo cytospin to obtain the pellet. To the pellet, cytospin collection fluid (light green colour) will be added to the cells. The amount the fluid to be added depends on the size of the pellet, i.e the fluid added must be at least twice the amount of the size of the pellet. A pipette was then used to mix up the mixture.
After these, a cytofunnel chamber is prepared. A glass slide, together with a filter card are attached to the cytoclip and cytofunnel. The whole cytofunnel chamber is then loaded into the cytospin. Due to the pressure from the spinning motion in the cytospin, the cells will be imprinted in the slide, according to the size of the filter card. Similarly, the slides will be stained in an autostainer.
Although both gynae and non-gynae specimens are stained with the same stains, they are stained in different autostainers. This is to prevent contamination of the different types of specimen. After staining, the slides will be mounted and screened under the microscope for abnormalities.

Process of assembling the cytofunnel chamber
Picture taken from: http://www.thermo.com/eThermo/CMA/PDFs/Various/File_24579.pdf
In the cytology lab, all equipments used will be disinfected with reagent CIDEX OPA. For the other disposable equipments like pasteur pipette and supernatants, they will be disinfected and discarded into a small bin of dissolved chlorine tablet.
Hey people! I'm here to share about my SIP experience of the 1st week! (:
As for the first 3 days of the first week, I was attached to the Cytology Department. Cytology is the analysis of cells to diagnosis diseases. The lab deals with 2 types of specimens : 1) Gynaecological Specimens and 2) Non-gynaecological Specimens.
Gynaecological specimens refer to Pap Smear of the cervix, while non-gynaecological specimens refer to fine needle aspirations (FNA) and bodily fluids collected.
Examples of the bodily fluids collected can be: Urine, Pleural, Pericardial and Peritoneal washings. And, FNA can be from the thyroid, lymph nodes, breast, bones, etc.
The
routine process of the lab upon receiving the specimens is:Maintaining of the specimens on the computer (that is to generate an access code/individual code for each specimen) -> generate the label sticker for labelling of the specimens-> processing ->staining-> mount-> screening of cells under the microscope.
1) Processing of Gynaecological specimens (Pap smears)
Pap smear is a screening test that determines any abnormalities of the cervical cells that may lead to cervical cancer. The aim of a pap smear is to detect any Cervical Intraepithelial Neoplasia (CIN) caused by the Human Papilloma Virus (HPV).
Basically, there are 3 different grades of CIN: CIN I- mild dysplasia, CIN II- moderate dysplasia, CIN III- severe dysplasia.
There are 2 ways if preparing and processing pap smears: 1) Conventional method, and 2) Liquid-based cytology.
The conventional pap smear method is carried out by collecting the cervical cells using a spatula or endobrush, then smearing the cells directly onto a glass slide. Next, the slide is fixed immediately with alcohol spray. This immediate fixing is to prevent drying artifact from happening. However, the conventional method is not widely use anymore because the smear may contain other debris like blood, mucosal or inflammation cells. Also, it produces a thick layer of cells that are overlapping each other, thus, affecting the efficiency and accuracy of the screening process.
Instead, the Liquid-based cytology is being adopted now. This method employs the use of a machine known as ThinPrep processor. The processor will cleverly differentiate and separate the cervical cells from any debris, blood, mucous and inflammation cells. Another advantage of this processor is that it creates uniform and even layer of cells.
These are the instruments involved in a ThinPrep Pap Test:

From left: Spatula, endobrush
Picture taken from: http://www.imvs.sa.gov.au/tissuepath/graphics/spatula_conventional.jpg

Broom-like Brush
Picture taken from: http://www.cervexbrush.com/images/CombiLong.jpg

Vial with preservative fluid
Picture taken from: http://www.labnews.co.uk/cms_images/Image/Prod-Dec-07/31-NOV.jpg

Inside of the ThinPrep Processor
Picture taken from: http://cyto.igabinet.pl/data/user_files/image/TP%20Processor%202.JPG

Slide produced from ThinPrep
Picture taken from: http://www.muliabrothers.com/Picture1TP.jpg

Difference in the quality of the slides produced by Conventional and ThinPrep method
Picture taken from: http://imaginis.com/graphics/cervical-cancer/pap_smear.gif
An endobrush, spatula or broom-like brush will be used to collect the cervical cells. After which, the brush will be rinsed vigorously in a vial containing preservative fluid. The vial will then be loaded into the ThinPrep machine for processing.
A suction filter will be inserted into the vial to filter the cells, separating the cervical cells from any debris, blood, mucosal or inflammatory cells. The cervical cells will then be imprinted on the glass slide. After which, the machine will gently drop the slide into 95% xylene for fixing. After fixation, the slides will go through pap staining in the autostainer, Leica Autostainer XL. The slides will then be mounted and screened under the microscope for any abnormalities.
2) Processing of Non-gynaecological specimens
The processing of non-gynae specimens is quite different from gynae specimens.
First of all, the specimens will undergo cytospin to obtain the pellet. To the pellet, cytospin collection fluid (light green colour) will be added to the cells. The amount the fluid to be added depends on the size of the pellet, i.e the fluid added must be at least twice the amount of the size of the pellet. A pipette was then used to mix up the mixture.
After these, a cytofunnel chamber is prepared. A glass slide, together with a filter card are attached to the cytoclip and cytofunnel. The whole cytofunnel chamber is then loaded into the cytospin. Due to the pressure from the spinning motion in the cytospin, the cells will be imprinted in the slide, according to the size of the filter card. Similarly, the slides will be stained in an autostainer.
Although both gynae and non-gynae specimens are stained with the same stains, they are stained in different autostainers. This is to prevent contamination of the different types of specimen. After staining, the slides will be mounted and screened under the microscope for abnormalities.

Process of assembling the cytofunnel chamber
Picture taken from: http://www.thermo.com/eThermo/CMA/PDFs/Various/File_24579.pdf
In the cytology lab, all equipments used will be disinfected with reagent CIDEX OPA. For the other disposable equipments like pasteur pipette and supernatants, they will be disinfected and discarded into a small bin of dissolved chlorine tablet.
Wednesday, July 1, 2009
Research: Nanodrop
Hi, I'm JIAHUI (:
These 1 week and a half, I've been really busy!! With all new things that I need to learn, there's so much to blog about!
These 1 week and a half, I've been really busy!! With all new things that I need to learn, there's so much to blog about!
Nanodrop (ND-1000 V3.1.2)

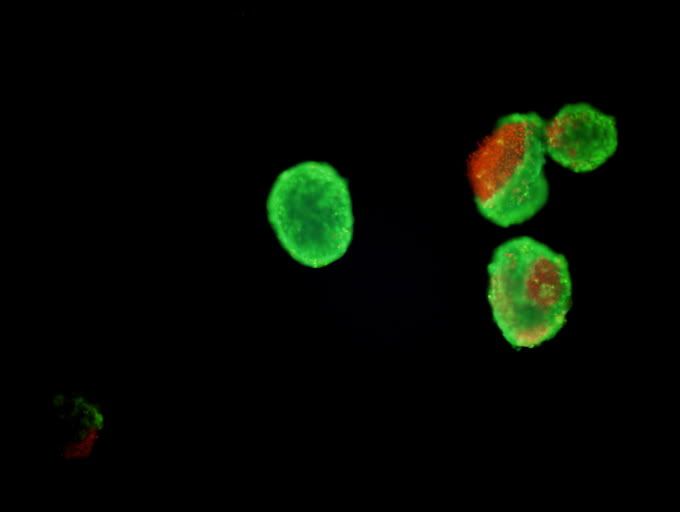
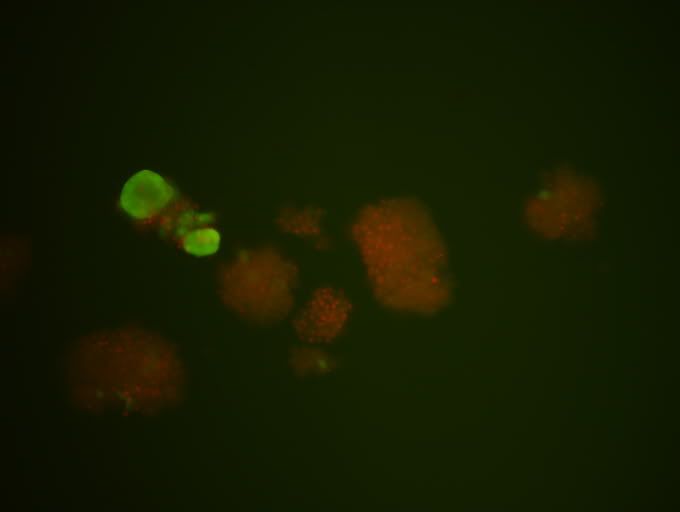
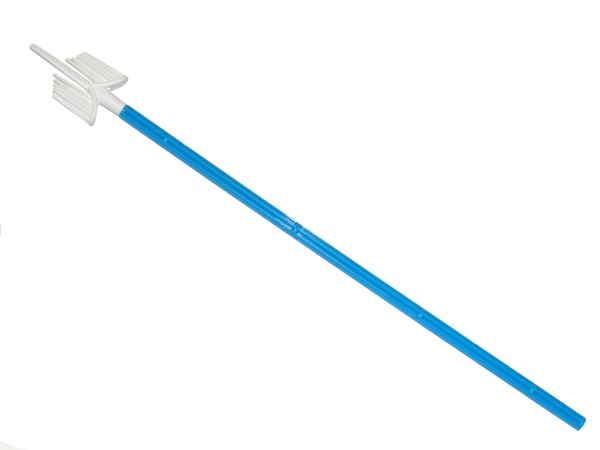
NanoDrop is a low-volume spectrophotometer that is used to measure concentrations of cDNA, proteins and RNA. It does not require the use of curvettes. It is also capable of using just 1μl of sample to measure a wide range of concentration, from as low as 5ng/μl to as high as 3000 ng/μl. (1)
Method:
1. Wash the metal tip with ethanol. Wipe clean with Kim wipes by dabbing.
2. Wash the metal tip with RNase-free water. Wipe clean with Kim wipes by dabbing.
3. Choose program ND-1000 V3.1.2.
4. Click on nucleic acid
5. Sample type: other (for cDNA)
6. Constant: 33
7. Add 1.5μl of RNase-free water and blank it.
8. After each addition of sample, wipe clean with Kim wipes.
9. Add 1.5μl of sample.
10. Record 3 results.
a. 260/280 (RNA/DNA ratio)
b. 260/230 (RNA/protein ratio)
c. Concentration (ng/μl)
RNA/DNA ratio and RNA/protein ratio = ideally more than 2
Depending on your sample type, the constant changes.
cDNA: constant = 33
RNA: constant = 40
1. University of Texas (2009). NanoDrop. Retrieved on 26th June 2009, from: http://www.icmb.utexas.edu/core/DNA/NanoDrop/Nanodrop.htm
It's that simple! (:
Done by, Lim Jia Hui
0703605F
Subscribe to:
Posts (Atom)