Physiological role
G6PD is a key enzyme in the hexose monophosphate pathway (HMP) and is required for the formation of NADPH. NADPH is essential for maintaining the integrity of the erythrocyte membrane.
Specimen collection and preparation
- Process specimen collected in EDTA tube
- Before analysis, check that the specimen is not clotted
Clinically significance
G6PD deficiency may be cause of hemolytic disease of newborns in Asian Mediterranean. Drug-induced hemolytic anaemia is most commonly associated in erythrocyte deficiencies of G6PD.
This deficiency is due to presence of a labile G6PD enzyme that is present in young cells but rapidly disappears with cell aging. A range of variant defective enzymes have been found in different racial group.
Performing G6PD screening test by R&D diagnostic G6PD deficiency screening test kit
- Label a filter paper (in test kit) with the running number
- Label 4 spaces in filter paper for Blank, Normal, Intermediate and Deficient control
- Pipette 100µ of substrate into all the tubes. Substrate must be at room temperature for test
- Mix the Normal control (a previous day’s specimen with G6PD present). Pipette 5µl into its labeled test tube containing the substrate, mix and immediately start the timer
- Using a sufficient time interval between sample, mix the Intermediate control and likewise pipette 5µl into its labeled test tube of substrate and mix.
- With the same time interval between samples, pipette the Deficient control and test samples accordingly
- When the timer reaches 10minutes, mix and pipette 10µl of the Normal control mixture onto its labeled portion on the filter paper
- Following the same time interval between samples, likewise mix and pipette the Deficient, Intermediate controls and the rest of the samples into their labeled position on the filter paper
- Pipette 10µl of the working substrate onto the position labeled “Blank”. Allow filter paper to dry completely and place it in the ultraviolet viewing cabinet
- Close the “Frontal Access Door” and switch on the “Long wave switch”
- View fluorescent through the viewing port which has ultraviolet absorbing filter to protect the eyes and increased fluorescent contrast
- Specimen from patient with normal G6PD activity will show strong fluorescence. Failure to fluorescence after 10minutes incubation suggests a total lack or marked deficiency of G6PD
- Strong fluorescence as compared to the intensity of the positive control, report as present. Report doubtful for weak or no fluorescence as compared with the intensity of the Intermediate deficient control
- Check doubtful specimen for blood clots
o If clot, repeat test with new specimen
o If no clot, repeat test
o All doubtful specimen are required to do G6PD quantitative determination
Yeo Sok Kian Jocelyn
0703359J
Wednesday, September 30, 2009
Monday, September 28, 2009
Freezing of cells
Cell freezing is done if the cell type used is rare or for storage purposes or for transport. It is a very simple procedure, only require a few steps.
Protocol (For freezing 1ml)
1. Trypsinize cells
2. Count cells
3. Resuspend cells with medium (Cell density should be ~50 000 - 1 000 000 cells/ml)
4. Add 900ul of cell suspension and 100ul of (Dimethyl Sulfoxide)DMSO into a cryovial.
5. Freeze at -80 degree celsius or -196 degree celsius.
Note: DMSO acts like a cryoprotectant which prevents damage arising from freezing.
Alvin
Tuesday, September 15, 2009
Biochemistry Lab
Hi there, I am here to share again, and I would also like to apologise for the late posting!
Fecal Occult Blood Test
This test is a non-evasive test that detects occult (hidden) blood in the stool samples. The occult blood test can be used to screen for any bleeding along the gastrointestinal tract and also for colon cancer.
Materials used:
Hemoccult Sensa Test Kit which comprises of 2 main component:
1) Hemocult Sensa Slides : Test cards containing the guaiac paper.
2) Hemocult Sensa Developer: A developing solution that contains a stabilized mixture of hydrogen peroxidase (42%), 80% ethyl alcohol and enhancer in aqueous solution.
Principle of Test:
The Fecal Occult Blood test is based on the oxidation of guaiac by hydrogen peroxidase into a blue compound. The heme portion of hemoglobin (if present in the fecal specimen) has peroxidase activity which will catalyze the oxidation of alpha-guaiaconic acid (an active component of the guaic paper) by hydrogen peroxidase. Hence, forming a highly conjugated blue quinone compound.
Method:
 1) Label the test card with the patient's sticky label
 2) Open up the test card, there will be 2 boxes A and B.
 3) Using the wooden applicator, collect a small amount of fecal sample of the patient.
4) Apply a thin smear in box A.
5) Re-using the same applicator, obtain a second sample from a different part of the fecal sample. Apply a thin smear in Box B.
6) Close the cover flap and flip the card backwards. 7) Open the flap on the back of the card. There will be (i) an area to allow the developer to drop
directly on the smear, (ii) a Performance monitor area that consists of a positive and negative control.
 8) Apply 2 drops of the Hemoccult SENSA Developer onto the guaiac paper directly over the smears.
9) Apply 1 drop of the Hemoccult SENSA Developer between the positive and negative performance monitor areas. Results:
10) For the test, results must be read within 60 seconds. Any trace of of blue at or on the edge of the smear, the test is considered positive for occult blood.
11) For the performance Monitor, results have to be read within 10 seconds. If the test slide is functional, a blue colour will appear on the positive performance monitor area and no blue for the negative performance monitor area.
* In this case, the test card is functioning well, and the test is negative for occult blood. i.e the patient do not have occult blood.
Note
To avoid false positive results:
*Sample should not be collected when patient is having menstruation.
*Patient should aviod taking red meat (beef, lamb, liver) 3 days before stool collection.
*All pictures are taken and posted after permission granted by my supervisor.
Posted By: Tan Siew Ming
0702862D
Thursday, September 3, 2009
viability (live/dead) staining
Hi everybody!! It’s me again!
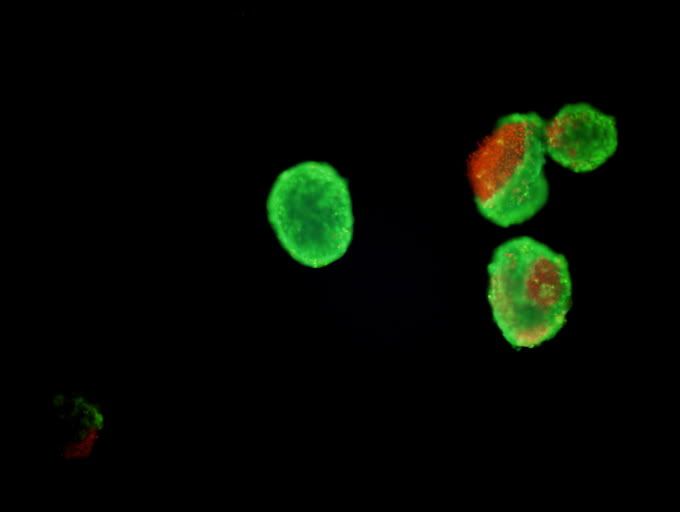
Today, I would like to share with you guys how to perform Live/Dead Staining! This is a viability assay, similar to the process that Stanley has discussed in his post. However, this is not a quantitative assay.
I am using fluorescence to detect live / dead cells.
Concept
Live cells are capable of metabolism, therefore we add Calcein AM. Calcein is a fluorescent dye, and Calcein AM is the acetomethoxy derivate of calcein. Calcein AM is able to enter cells through intact cell membrane and thus is capable of determining live cells. Intracellular hydrolase enzymes (or intracellular esterases) will hydrolyze AM, and release green fluorescent anion calcein. This calcein will be retained in the cytoplasm of cells. Under fluorescence, a green cell is observed. On the other hand, when cells die, the plasma membranes of these cells are compromised. Hence AM will not be hydrolyzed. Instead, Ethidium homodimer-1 (EthD-1), is added. EthD-1 is also a fluorescent dye which will enter cells with compromised cell membrane. The dye will then bind to DNA in the nucleus. As EthD-1 is red in colour, it will give a red fluorescent under fluorescence.
We store them in 4oC. Since these are fluorescent dyes, they are sensitive to light. Hence when we add these chemicals to cells, we perform the experiment in the dark and cover in aluminium foil.
Calcein AM is diluted with cell culture medium/solution à 0.5ul/ml of solution (depending on what type of cells you using)
EthD-1 is diluted in cell culture medium/solution à1ul/ml of solution
Eg
- 1. Add 1ml of media to each well containing cells.
- 2. Add the dyes to cells. (Calcein AM: 0.5ul / EthD-1: 1ul)
- 3. Incubate at 37oC for 20-30 minutes.
- 4. Observe under fluorescent microscope.
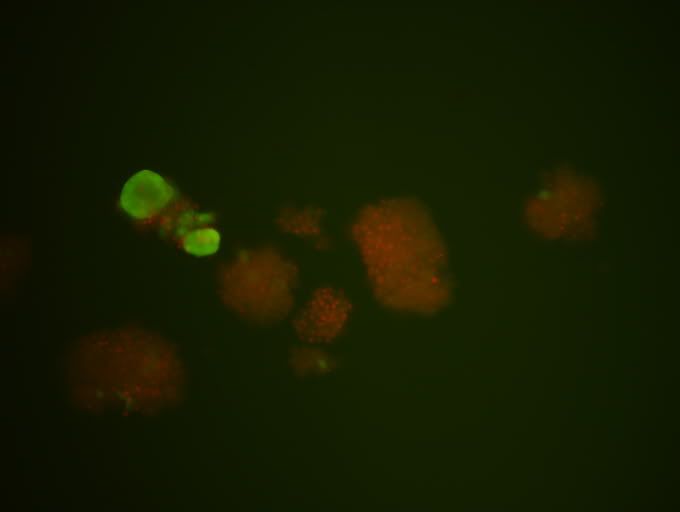
Here 2 pictures for you guys to enjoy!
apparently blogger is down AGAIN, so it doesn't let me post pictures!
so here are the hyper- links instead.
Figure 1: http://i201.photobucket.com/albums/aa29/sakura_1990/Image16.jpg
Figure 2: http://i201.photobucket.com/albums/aa29/sakura_1990/Image47.jpg
(here's the direct link if the above hyperlink doesn't work)
Figure 1 shows it all. There is live cells and going-to-die cells. As u can see from cell number 2 from the left, there is a portion of red fluorescent. This indicates that the cell membrane is compromised/ or cell has burst. This indicates that the cell is probably dead.
Figure 2: More obvious dead cells.
hopefully u guys can see the links. if there's any trouble, do leave a comment. I'll get back as soon as possible.
(the photos are released with permission).
posted by LIM JIA HUI (: tg01 0703605F
Subscribe to:
Posts (Atom)